Ontario Fishing Network - Fishing Lodges - Fishing Tackle - Fishing Gear

Ontario Fishing Network
E-Magazine

www.ontariofishing.net
Volume 6,  Issue 4 - April  2006


Bucktail Spinnerbait Restoration, Repair and Modification
By
Tim Allard

Musky tackle takes a beating and I have yet to meet one angler who pampers their equipment. The fact is, baits wear down and eventually need maintenance to get them back into trophy-catching shape. This article will focus on repairing bucktail spinnerbaits, looking at: tying bucktail, replacing blades, hooks and wire bodies, and painting components. Let's start with the most complex, how-to tie bucktail.

Tying Hair:
Tying bucktail is easy with the right equipment. You'll need to following tools and material for tying: a tying vise large enough to hold large hooks and wire, a selection of bucktails, strong "D" tying thread, a long-armed bobbin, head cement, clear coat epoxy or nail polish hardner, and pointed tip scissors for cutting thread. For bait modifications, you'll also need: split ring and needle nose pliers, wire cutters, powder paint as well as vinyl (or substitute nail polish), ball bearing swivels, and extra beads, clevises and blades.

To repair a bait, first cut the thread collar and remove the old hair. If you plan to reuse the bucktail, remove the thread and glue from the hair so it will tie properly. Next, scrape away any remaining thread or head cement from the tying area. At this stage decide if you need to touch up or repaint the bait's head before tying new hair - I'll cover painting in a separate section.

Prepare to tie by securing the bait in a vise and thread the bobbin. Next, wind a base layer of thread on the collar if tying hair to the 
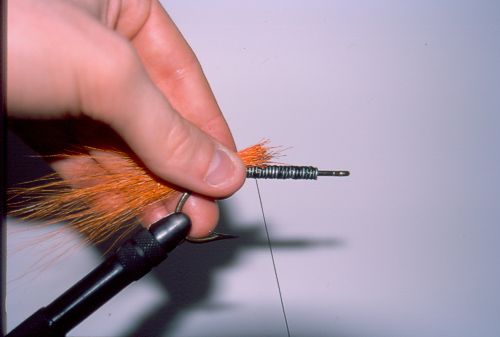
spinnerbait's head. For trailer hooks, I first wrap wire around the hook shank; the wire coil provides more surface area to tie to, allowing you to create bulky bucktails. Next, wind thread around the coil, filling in any spaces with thread. This prevents thread from catching and breaking during the tying process. Once a base of thread is applied, rest the bobbin on the tabletop to prevent it from spinning. Line twist weakens the thread's tying strength. Apply head cement to the wraps.
To tie the hair, cut a section away from the bucktail or reuse old hair. For new hair, tease out small hairs and fibres with your fingers as they limit the thread's hold on longer hairs. Experiment with how much hair you tie at once; small sections of hair can be easier to handle.


A section of bucktail positioned above the coil.

Next, position the hair's cut ends on the collar, firmly pinching both the hair and collar. While still holding the hair with one hand, loosely wrap the thread two or three times around the hair with the other hand. Wrap progressively tighter for the next six to eight wraps and slowly release the hair. The sooner you let go and the tighter the wraps, the more the bucktail will flare out. Once the hair is secure, cut away excess hair in front of the wraps, apply head cement, and repeat this process, covering the rest of the tying area. After tying three-quarters of the bait, rotate it 180 degrees in the vise to tie the final section.


A second section of bucktail is tied directly in front of the first.
Notice how the positioning of the brown hair causes it to flare up and out

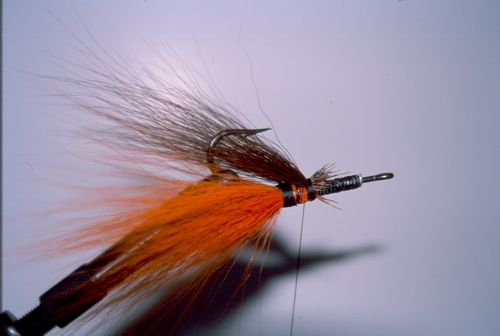
After tying the final section, apply extra thread to build the collar. To increase the size and profile of your bait, tie one or two more sections of bucktail in front of the first thread collar. To finish, wrap thread to create a tapered collar, apply head cement, tie a finishing knot and cut loose thread.

Blades:
Use these steps to replace chipped blades or to change blade style or size. Trailing blades can be quickly changed with split ring pliers or by opening the snap swivel connection. To replace clevis-connected blades, cut, or straighten, the looped wire so you can remove the beads and clevis. Loop the blade on the clevis, and thread the clevis on the wire so the blade's inside curve is facing backwards. Use pliers to reattach the trailing blade. Make a loop in the wire end, leaving enough room to attach the swivel or split ring of the last blade, before closing the loop.

Paint:
I prefer powder paint when making new spinnerbait bodies, but use vinyl or nail polish for touch ups. Like any painting, all surfaces must be clean for the best adhesion and touch ups rarely produce a perfect color match. For touch ups, use a small brush to apply vinyl paint over chipped areas. A white base coat should be applied underneath for bright colors and a clear coat added for protection. To use powder paint, clean and dry the sections to be painted. Next, heat the item to be painted for a few seconds over a flame and quickly dip and cover in powder. Remove from powder and hang as the paint melts to the heated area. Try baking powder painted baits after dipping for a durable finish.

Replacing Hooks and Wire Bodies:
To replace a trailer hook to a spinnerbait, tie on bucktail as described above and remove the old hook with cutters. Next, thread the new hook over the barb of the main hook. Sometimes the trailer hook eye is not large enough to fit over the main hook's barb. An easy solution is to widen the trailer with cutters. Do not cut the hook, but rather squeeze the join to expand the eye enough so it fits over the barb. Once on, simply pinch the eye back to its original size. For extra hold, thread a small circle of plastic, or shrink tube, on the main hook above the trailer and head to hold in place.

If the main hook of the body has been cut, or if the bait's wire is twisted beyond repair, purchase a spinnerbait body with hooks and a lead head. Then reuse your old components and the steps above to create new bait for a fraction of the cost of a new one.

Repairing your spinnerbaits is not only an excellent way to save money and extend the bait's lifespan, but tying and modifying baits will increase your awareness of how these baits perform. Additionally, small modifications, such as tying in tinsel or treading a grub to a trailer hook, can be the extra detail needed to fool a following muskie.


Temperature, Tackle and Techniques
 Early Season Longlining For Trout

   J.P. Bushey

Bucktail Spinnerbait Restoration, Repair and Modification
   by Tim Allard

Floating for Spring Steel
   by Don Sangster

Today's Catch - Interview with Charlie Wray
  by Peter Wood

Enter Our Monthly Contest
Great gear up for Grabs

Fishing Lodge Classifieds Come fish your heart out at one of our many Lodges, Camps and Resorts.

Archived Articles
Click here to see articles from past E-Magazines

Ontario Fishing Videos
Ontario Fishing Classifieds
Ontario Fishing Photo's
Ontario Fishing Lodges